| DARK PRINTS: WHY, AND HOW TO FIX THEM |
 |
|
This article offers a basic outline of the steps required in understanding why your photographic prints may be too dark. There isn't always an easy fix for such a situation, and there are various factors that can contribute to a dark print.
We look at a few ways to troubleshoot this issue, and offer some background that will help you begin your own research and learn why your images, on your monitor, printed with your printer are not turning out as you wish.
|
SUMMARY
| WHY SO DARK? |
NO PRINT ALTERATION |
EDITING DIGITAL IMAGES |
| There are a number of possibilities for why your images are printing so dark. It could be the way you are editing your photos, but it could also be due to your monitor, printer, ambient lighting, or other factors. |
Make sure your prints really are dark in all lighting levels. Check monitor brightness and calibration. Make sure you are consistent in your editing and your viewing workflows. Set up a printer profile. |
You can use the Levels histogram to adjust the brightness of your image more carefully than "brightness". Alternately, you can create a transparent layer to run test prints. |
|
| WHY ARE MY PRINTS SO DARK?
|
|
|
There are a number of factors that contribute to a dark photographic print.
While the knee-jerk reaction of some people is to begin fiddling with their image in their editor, that isn't necessarily the best step. Certainly, you're welcome to try fixing the issue with your editor, but be sure to make a copy of your original first. That way, if all that fiddling doesn't pan out, you still have the image from the first print and can try different methods.
Reasons other than editing that may be affecting your print:
- Monitor brightness
- Monitor calibration
- Inconsistent editing
- Viewing lighting
- Printer profile
The following section will consider each of these factors, and finally the ways to brighten your photos in your editor.
|
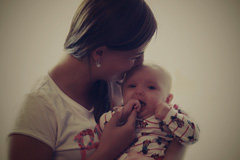
A dark image/print
|
| FIXING DARK PRINTS WITHOUT ALTERING THE PRINT
|
|
First, are you sure?
Is your print really too dark? If you're comparing it to your monitor - which you probably are - keep in mind that viewing source is lit from behind, not relying on the reflection of surrounding light sources, as the print is.
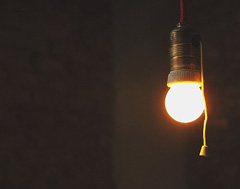
If you're viewing the print in a dark room with a single, low output light bulb in the ceiling, it's very possible your print only appears dark in your current location. Take the print outside, or in to a properly lit room, and see if it still looks too dark.
Monitor brightness
Simply dimming your monitor until it matches the brightness of the print is only a band aid for the dark print problem, but if you're just an occasional photo dabbler, it might be all you need.
If the monitor is dimmer, all your edits will revolve around making a brighter print. This isn't necessarily a good thing - if the problem lies outside the monitor brightness, you could end up with over-bright prints.
That said, some people do set their monitor brightness too high or too low (or just never change it from the factory default). A setting of 80-120 cd/m² is recommended for photo editing, so you'll need to figure out what that means for your specific screen.
One very basic test is to compare a print you think is bright enough to a monitor view of that same image. When viewing the print in good light, you can set you monitor brightness so the brightest white on the print matches the brightest white on the monitor.
Monitor calibration
Calibrating your monitor involves changing different settings so it shows you what the printer shows you (known as "what you see is what you get" or WYSIWYG). Your printer has no way of knowing what you see on your monitor - think of how easy it was for you to change your brightness! Monitors also need to be calibrated for your workspace, since very bright lighting will make your monitor appear dimmer, and vice versa.
This Imaging Resource article has lots of great information, an easy test to check your calibration, and a comparison of different calibration software and hardware.
Besides the screen brightness, you will also be fixing your color temperature and the gamma on your monitor, which will result in a better viewing experience.
Consistency in editing
Have you read our article about color spaces and color models? We won't go into detail here, but suffice to say you should always be editing your photos in the same color space. That is, sRGB or Adobe RGB, or whatever color space you choose.
If you edit each photo in a different color space, there's a good chance you'll end up with prints that are all over the place in tone, brightness, and color.
Consistency in viewing
If your workspace has a big, wide window that lets in lots of light, you aren't in the best situation for viewing photos. Depending on the time of day and the cloud cover, the lighting in your workspace can go from blinding to dimly lit.
Special viewing boxes are available for this purpose, or you can simply make sure you are always looking at your prints in the same lighting - under the bright vanity lights over the bathroom mirror, for instance.
Speaking of your viewing space, take a look at your desk area. The white of the monitor should be the brightest white you see. In other words, there should not be any lights reflected in the screen, or any glare from the window.
Printer profiles
Though it can be a lot of work, and won't be useful if the above factors aren't considered as well, you can always set up a printer or ICC profile. This allows your photo editor to take into consideration the inks and the specific printer type when preparing your image for print.
In the end, however, your monitor needs to match your prints, regardless of your printer settings, or you will never achieve that sought-after WYSIWYG!
|
Consider monitor brightness and calibration
Consider the ambient lighting of the room
|
| FIXING DARK PRINTS WITH MINOR EDITING
|
|
We will be referring to Photoshop tools in this discussion. If you use a different editor, you may need to research the equivalent processes.
Use the levels histogram
You can use the histogram (a graph diagram) in the Levels adjustment to adjust for the overall brightness of your image. This is perhaps the simplest for black and white images: the left side of the histogram shows the darkest shades and the right side shows the whitest.
By moving the three arrows below the graph, you can adjust the darkest, lightest, and mid-sections of the image. You can play around with this to see the results, or research use of the Levels adjustment (or equivalent for your editor).
Use the shadow/highlight adjustments
The shadow and highlight adjustments in Photoshop can not only brighten your image (and therefore your print), but also bring out details that appeared lost in shadow.
Shadow/highlight is a quick and easy way to improve the exposure of your image. Simply go to Image > Adjustments > Shadows/Highlights and adjust the sliders. Increasing the Shadows % will lift the shadows from the image, brightening it in a different way than the Levels adjustment does, and bringing out previously dark details. Increasing the Highlights % darkens the highlights on the image.
You can adjust the single sliders for each quality or, if you need more finetuning, check the "show more options" box at the bottom of the window. This will give you three different sliders for each: amount, tonal width, and radius. This also makes available the color correction, midtone contrast, black clip, and white clip adjustments.
Use layers to test
This simple process can help you test out different brightnesses without actually altering your digital image.
- Duplicate the image layer (the background if you have multiple layers).
- Change the blending property from "Normal" to "Screen".
- Change the opacity to 25%.
- Run a test print.
- If the print is still too dark, try raising the opacity to 35%.
While this is not necessarily a final fix, it will give you an idea of where the changes need to be made, and whether the cause of the darkness is due to issues other than editing!
|
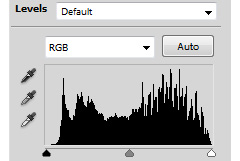
Histogram for dark image shown above
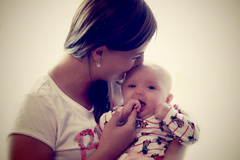
Image lightened with levels histogram
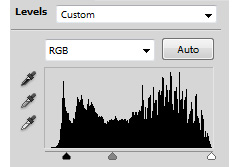
Histogram for lightened image
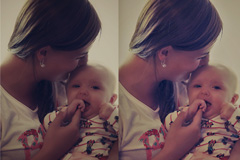
Left: original;
Right: after shadow/highlight adjustment
|
|
At KeenART Media, we will always let you know if we think your image could use a little brightening prior to printing. We are also happy to print test strips for your approval prior to printing your full image. If your order is for a 16x20" print or larger, a 4x6" test strip is available free of charge!
If you have questions about any of our services or products, don't hesitate to contact us. Our knowledgeable staff are available to assist with answers, advice, or suggestions.
|
|
© 2002-2024 - KeenART Media Ltd.
|
|
| |
|