| ALL ABOUT MOUNTING ARTWORK |
 |
|
The term "mounting" is tossed around quite often in the picture framing and wall decor business, but there are so many different ways to mount art, and even completely different meanings, it's no wonder customers and even technicians easily get confused.
Generally, to "mount" two dimensional art is to attach the individual piece of paper (or fabric, vinyl, etc) to the surface on which it will be displayed. This may be a temporary process, such as placing a school photograph of your child in a frame, and then changing the photograph when next year's picture is taken.
Alternately, it can be a permanent process. This process has two versions:
- Archival Mounting Methods are generally intended to be permanent or very long lasting, but they do not alter or damage the original artwork in any way. In other words, if the customer wanted to change the display in the future, it could be easily done. An example of this is most professional picture framing.
- Non-Archival Mounting Methods leave the art permanently affixed to the surface, and to remove it would mean to tear or damage the art (professionally, we say "the art cannot be returned to its original condition"). These processes are usually recommended for prints as opposed to originals. Plaque Mounting is an example of a non-archival method.
Another definition of "mounting" artwork is the literal act of hanging it on the wall. We will not be discussing these methods in this article, but if you're interested, please read our Hanging Hardware guide and our article on Art Hanging Systems.
|
SUMMARY
| MOUNTING IN A FRAME |
Artwork being displayed in a frame can be mounted directly onto the backing board, onto the mat if one is being used, or in a "float" mount style, in which the art appears to "float" in the frame between two panes of glass. These methods may or may not be archival. |
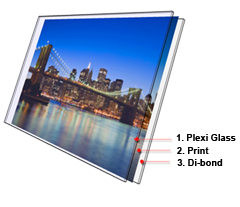
| PLEXI-FACE MOUNTING |
Plexi face mounting consists of sandwiching a print between a sheet of plexiglass and a sheet of an aluminium composite called Di-bond. This is a non-archival method of mounting. |
| TEXTILE MOUNTING |
Non-paper mounting refers to the process of displaying fabric or other two dimensional materials, usually behind glass in a frame, although other mounting methods are possible. Depending on the process used, the result may be archival or non-archival. |
| WET MOUNTING |
Wet mounting means a wet or tacky adhesive was applied in order to adhere the print to the backing board or clear cover. This can damage some paper prints that should not be allowed to become wet. This method is always non-archival. |
| DRY MOUNTING |
Dry mounting uses a heat- or pressure-adhesive material (usually tissue) to mount the print on the backing board or clear cover. This is the preferred method for permanently mounting paper prints, as no wetness is present to damage the image. This method is generally non-archival. |
|
| TRADITIONAL ART: MOUNTING IN A FRAME
|
|
|
There are many different ways to mount art in a picture frame, and each framer has their preferred method. Different processes are employed depending on whether the finished display will have a mat or not. (You can read more about choosing a mat for your artwork in our article All About Mats.)
MOUNTING WITH A MAT
If a mat is used, the artwork will be mounted to the back of the mat before being placed in the frame. It is best to affix the pieces together using only one piece of adhesive at the top center of the artwork rather than adhering it all the way around, or in each corner. This way, as the art and mat expand or contract over time due to changes in humidity and temperature, you avoid buckling or wrinkling.
The process of connecting the mat and artwork in one center spot is called "hingeing," and special hinging tissue can be purchased especially for this. Many of these tissues are acid-free and can be removed easily with water or alcohol. Such products can be used in archival mounting. If long-term preservation is not required, a general use masking tape can also be used.
One archival alternative to hinging is to use adhesive plastic or paper corners, such as those used in photo albums. No adhesives will mar the artwork, and by leaving a bit of space the artwork can still expand without buckling.
We have a wide range of matboards to choose from.
MOUNTING WITHOUT A MAT
The above-mentioned adhesive corners work well when framing art without a mat, too, although the framer must ensure the corners are completely hidden behind the lip of the frame.
Adhering the top back of the artwork to the backing board with double-sided tape also works well for framing artwork with no mat. Hinging tissue can also be used to wrap from the back of the backing board around to the front of the artwork, overlapping only about 1/4" - little enouch to keep the tissue from being visible when the art is framed.
FLOAT MOUNTING
Float mounting is used when the edges of the artwork are part of the art, such as a rough, deckle edge. The art is either sandwiched between two panes of glass and placed in the frame, or it is affixed to a matboard with no opening cut in it. In the latter case, a small shadowbox may be used, allowing the art to separate slightly from the backing, creating depth.
Either way, the art must be adhered to the back glass or matboard so it does not slip down once framed. This can be done with a double-sided adhesive or with hinging tissue. The method used will depend on size, and whether or not the product must be archival. Either way, only the top edge should be secured, just like the other frame mounts.
|
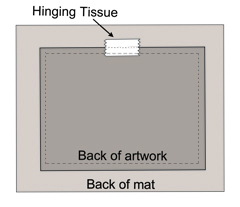
Mounting art with a mat
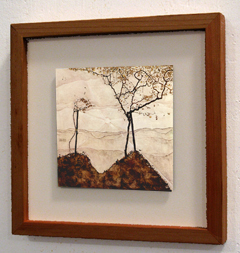
Float mounted art
|
| PLEXI FACE MOUNTING
|
|
|
Plexi face mounting is a unique and modern way to display artwork. It is a non-archival method, however, and should be used only on unlimited digital prints - never on originals or limited editions.
- Once the print has been made, it is placed face-down on a piece of plexiglass that is cut to size, with a thin sheet of heat-sensitive mounting tissue in between. When compressed in a heat press for a few minutes, the mounting tissue adheres the print to the plexiglass. It is perfectly clear, and generally acid-free so as not to yellow over time and with light exposure.
- Another sheet of mounting tissue is placed between the back of the print, and a sheet of aluminium di-bond (a composite material made from a thin sheet of aluminium sandwiched between layers of polyethylene). Alternately, the di-bond may have an adhesive on one side.
- Again, the face mount is heat pressed, affixing the backing to the artwork. Hanging hardware is attached.
Because the plexiglass in a plexi face mount is pressed directly against the print, light is forced to reflect differently than in a regular, framed picture. The result is an almost three dimensional effect, and bright, vibrant color or deep, bold grayscale.
For more information, please see our Plexi Face Mounting FAQ.
|
|
| MOUNTING TEXTILES
|
|
Some collectors or artists may choose to mount their hand-painted or hand-dyed textiles such as tapestries, weavings, scarves, or other fabrics. In this section we will discuss three different methods for hanging textile art.
UNFRAMED TEXTILES
Items such as quilts can be displayed without a frame by hanging them from a wooden or plastic dowel and suspending the beam from the wall or ceiling. The art may or may not have casing in place for such a display. Casing may take the form of a hemmed edge through which the dowel can be slipped. Alternately, loops (similar to belt loops) may have been sewn along the back every few inches.
Another method undertaken by some museums is Velcro. The fuzzy side of the adhesive is hand sewn along the top of the textile, and the rough side is glued or stapled to a strip of wood, which is then mounted on the wall. While this does require putting holes in the textile, if it is of a thicker weave such as a rug, this method should not damage the piece. Thinner materials such as silk should not be mounted in this way.
FRAMING TEXTILES
If you would like to frame your textile art, mounting it against foam board is ideal. Small-head pins may be used to mount the textile to a surface such as foam board, which can easily be pierced, and the pins folded over in the back. The textile can also be stitched to the foam board, though this only works for lightweight pieces. Cardboard should never be used as a mounting board, as it is not acid-free and can begin to discolor or degrade materials within months.
When framing textiles, it is advisable to separate the glass from the artwork. Not only does this prevent and flattening or other damage due to the glass pressing against the textile, this method also showcases the three dimensional nature of the art. A shadow box frame or a picture frame with a rabbet of at least 1/2" (depending on the thickness of the art) is ideal.
OTHER MOUNTING
A third option for textiles is to mount them to a wooden stretcher bar frame, much the same way artist's canvas is stretched. The entire textile itself can be wrapped around the frame, or a smaller textile can be stitched onto an existing stretched canvas. This method is generally non-archival, but may suit certain purposes.
|
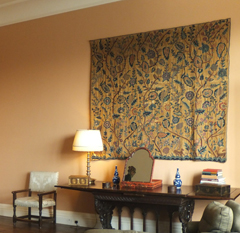
Wall-hanging textile art
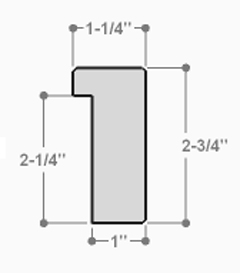
Shadow box with a 2-1/4" rabbet
|
| WET MOUNTING
|
|
|
Wet mounting is not a common method in professional art display, due to the fact that it can often damage the artwork. Because the adhesive is wet when the print is applied, it is difficult to predict how it will react as the adhesive dries. This can result in wrinkling, bubbling, or tearing of the artwork. It can also remove some media such as inks or paints.
THE ADHESIVE
Water-based glue is the most common product used in wet mounting. This glue can be thick enough to be kneaded in the hands and stretched across the mounting board, or thin enough to be applied with a brush. Spray adhesives are also available. Technicians who use wet mounting will know what consistency will work best for different types of artwork.
MOUNTING THE ART
Once the adhesive has been applied to the mounting board, the artwork is laid down, with the center coming into contact with the glue, first. Then a piece of paper is laid over the artwork and pressure is applied in a "starburst" pattern, working around pressing out from center to edge.
Often, technicians who use wet mountings will use the "countermounting" method if the mounting board is not completely rigid (ie: matboard or foamboard). This involves affixing a piece of paper the same weight as the artwork to the other side of the mounting board. This prevents the board from warping as both pieces dry.
|
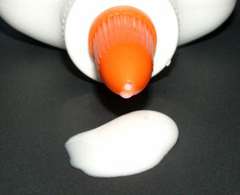
Wet mounting glue
|
|
In the Plexi Face Mount section above, I mentioned mounting tissue, and its use in adhering paper artwork to other surfaces (called substrates). This is the primary quality of this method, but dry mounting is not only used for plexi face mounts.
"Dry Mounting" refers specifically to the process of placing the artwork, mounting tissue, and backing board in the heat press, and applying heat and pressure to securely affix the pieces together.
Whatever the mounting surface, the tissue requires a certain temperature to be activated. This activation causes it to liquify and form the adhesive bond. Depending on the brand, the tissue needs to be heated to between 180°F and 275°F. Because the adhesive is liquified for a period of time, the weight applied by the press is required to ensure the artwork remains flat and does not shift during the process.
The following products are examples of dry mounting. For more information, see our Dry Mounting FAQs.
PLAQUE MOUNTS
Plaque mounting has been around for many years, and is often used for permanently displaying documents, awards, or important certifications. It is also popular for art and photography, however.
In a plaque mount, the backing board is a sheet of MDF fiberboard, usually about 3/8" thick. Once the artwork or photograph has been adhered to the MDF, the edges are bevelled and colored, and the surface is coated with a protective, UV-resistant laminate.
For more information on plaque mounts, see our Guide to Plaque Mounts and our Plaque FAQs.
DI-BOND
In addition to providing the backing for plexi face mounts, di-bond can also be used for other dry mounting projects.
At KeenART Media we can dry mount any of our fine art or photographic papers onto di-bond. Once mounted, you have the option to laminate the top of your dry mount for extra protection. This can create a clean and modern, industrial look; the di-bond is less than a 1/4" thick and the dark aluminium core is visible around the sides.
Matte, textured fine art paper also looks wonderful mounted on di-bond without a laminate. Though it is more difficult to keep clean, it adds to that raw, crisp look.
OTHER SUBSTRATES
In addition to di-bond, other surfaces can be dry mounted to paper prints. These include:
- Foam Board: a semi-rigid substrate made by sandwiching a sheet of styrofoam between two sheets of clay-coated paper.
- Black and White options
- 3/16" and 1/2" thicknesses
- Gator Board: a stiffer type of foam board with a wood-fiber veneer; more durable
- Black and White options
- 3/16" and 1/2" thicknesses
- Sintra: a lightweight PVC (plastic) sheet that is rigid and water- and corrosion-resistant
- Black and white options
- 1/8" and 1/4" thicknesses
- Matboard: 1/16" cotton-core, flexible board that comes in many different colors
HANGING DRY MOUNTED ART
Once your dry mount has been made, there are a number of different ways to hang it.
|
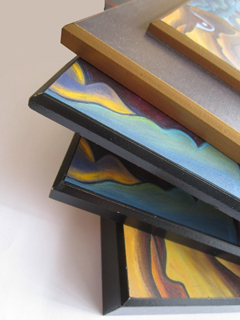
Plaque mounts
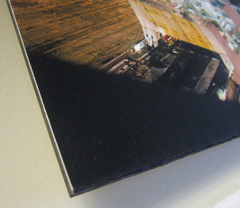
Matte print on di-bond
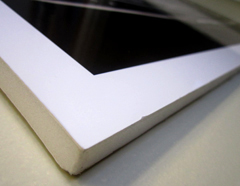
Glossy print on foam board
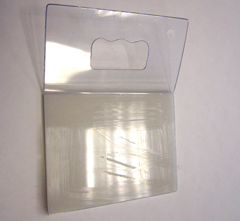
Plastic tab hanger
|
|
Mounting is a great way to display your fine art and photographic prints without a frame. With all the styles we offer at KeenART Media, you're bound to find something to suit your budget and project requirements!
If you have any questions about mounting artwork, or any of our other products or services, please do not hesitate to contact us. Our knowledgeable staff are always happy to answer your enquiries and provide suggestions or advice.
|
|
© 2002-2026 - KeenART Media Ltd.
|
|
| |
|